
Foam Padding - Electronic Packing material (free)
Woodland Scenics Course Turf (aka Flock) - From local Train Shop ($9.99/32oz Shaker)
Large Freezer Bag - Pilfered from Kitchen (free)
Spray Adhesive - From Hobby Lobby ($3.00)
Spray Matte Finish or Clear Varnish(not pictured) - From Hobby Lobby ($3.00)
Sharp Knife (not pictured)- For cutting foam
Disposable gloves (optional/not pictured) - Pilfered from work

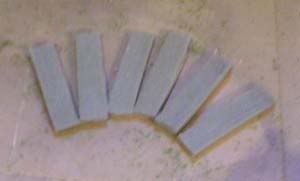
Step 1 - Cutting The Foam
Start by cutting the foam into strips. The strips can be any size you wish. In this example, I am making hedges for use with 28mm figures. The foam strips measures roughly 4.5in x 1.25in x .5in. Cut them slightly smaller than what you want the final hedges to be; I will explain in a bit. Also, they don't need to be exactly the same size. Variation is good.
Step 2 - Texturing The Foam
Take your thumb and forefinger and start tearing chunks of foam off the strips. You'll want to do this along all the edges, and randomly across the flat sides. They should look as below:

Now we need to turn the foam strips into our hedges. Fill the freezer bag about half full with the flock. In this case, I am using a 50/50 mix of Woodland Scenics Light and Medium green. One at a time, liberally apply each foam strip with spray adhesive. I wear the gloves at this point, because it can get rather messy, if you don't. It's up to you, though. Then take the foam a put it in the freezer bag. Give the bag a good shake, so the foam is completely covered with flock. This is where cutting them smaller comes into play. As it sticks to the foam, the flock will make the finished hedges that much larger than the foam. Place the hedges to the side to dry.
Sorry for the blurry pic. It's hard to get good help at 8AM on a Saturday around my house :-)

Step 4 - Finishing The Hedges
After the hedges are sufficiently dry (tacky to the touch is OK), liberally spray them with the Matte Sealer, or what ever you wish to use. I used Krlyon Oder Free/Clear Finish (the small can in the middle) that I had from a previous project. This will act to keep flock from coming off as the hedges are handled.

Basing the Hedges
At this point, the hedges are done, and ready to based as you wish. I usually base my on large craft sticks that have been finished as described in my Basing "how to" here on WTL:
At this point, the hedges are done, and ready to based as you wish. I usually base my on large craft sticks that have been finished as described in my Basing "how to" here on WTL:
Figure Basing - Basic Technique
The hedges can also be used as part of a larger display, if you wish
Finished Examples
Below, as some close of of some finished hedges (prebased) of different sizes:
w/ 28mm GW Space Marine
The hedges can also be used as part of a larger display, if you wish
Finished Examples
Below, as some close of of some finished hedges (prebased) of different sizes:
w/ 28mm GW Space Marine


No comments:
Post a Comment